Friday, August 30, 2013

"Decoupage your old shoes, are you joking?"


I have been asked so many times about the pictures that I put up about the Decoupaged Shoes that I said I would have to write a post about it.
Everytime we have a class on here at Ennis Creative Arts Centre students always comment on them and how beautiful they are.
When people realise that the shoes were Decoupaged they can't believe it.
So yes you can decoupage shoes and whats great about it is it usually only takes 1 sheet of decoupatch paper to cover the pair which costs only around €1.50.

To begin with you will need a sheet of decoupatch paper and the Decoupatch glue. You should be able to buy this at your local craft store. We sell it here also.
You can also use Modge Podge glue but I have never actually used it myself. I have tried just plain PVA glue as I have read in some articles that they suggest using PVA. I have tried this and the paper peeled off after a week or so.

So if you can, get your Hands on decoupatch glue. You can also buy it online.

The Decoupatch glue has a varnish in it which helps it fuse to the piece, thus enabling the paper to stick. For Good.

We use the paper and the glue all the time here at our furniture revamp classes and you can apply it to any surface really. Stone, Metal, Timber, Plastic etc.

Here are 3 pairs that I recently updated.

Take an old pair of shoes.

I loved these shoes and found them so comfortable and kept telling myself they needed to go but couldn't bring myself to throw them away.They did end up in the bin or one or two occassions but I tuck them out again. (Sad or what!). They were all scuffed at the front and one day at a decoupage class when I was doing up a piece of furniture it came to me. I wonder could you do a pair of shoes?
 I thought I was the first one ever to think of it. It turns out I amn't. You will find lots of photos on Pinterest of shoes that are Decoupaged. There I was thinking I had come up with a totally unique idea.

You can use basically any type of shoe but try and keep clear of shoes with a strap. I am only saying this as I did a pair with straps and Oh god it was a nightmare. Also don't use it on Fabric. I don't think it will take.

These were another favourite and they were just distroyed as you can see. Too many nights out. ( I wish). They used to have a flower on the front but they were a kind of see through style.They had a lovely heel and again were so comfortable.
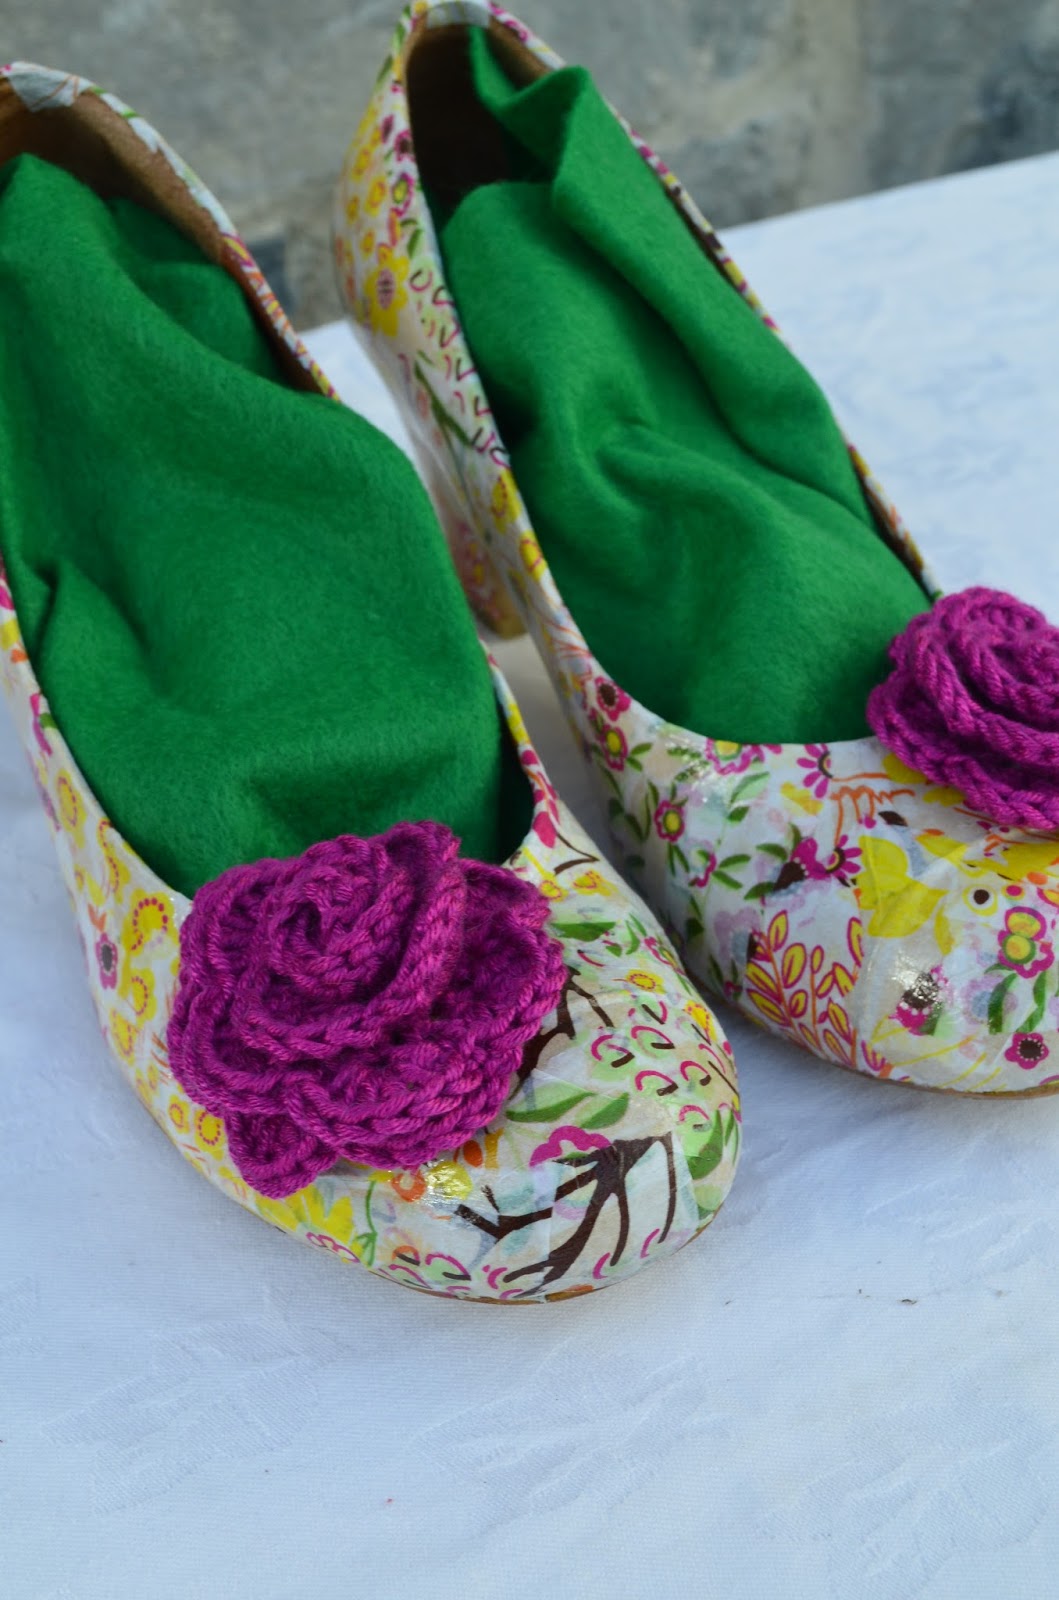
 Here are a pair that a student did here at one of the classes.
Didn't they turn out great.

We then crocheted a rose for the front. If you don't crochet you could buy something like a bow for the front. We applied the rose with a Hot Glue gun.


The pattern for these roses I got from a wonderful book called "Cute and Easy Crochet" by Nicki Trench. She has just wonderful patterns in it and for someone starting off I always use this book.

When you are finished Decoupaging the shoes apply at least 5 coats of varnish. It will prolong their life. The paper on mine did eventually crack but I only applied 1 coat of varnish so I think if I had applied more they would have held up longer.

I wore them about 4 times before they started to crack so I still think its worth it and the great thing about Decoupage is you can always touch it up.

So go on give it a try.

I just know you will get hooked.

If you would like to attend a class check out the next decoupage class where you learn all types of techniques and tricks using this wonderful material.

Love and laughs.

Shirley


Thursday, August 29, 2013

Crochet Butterflies.

Any of you that has visited my Facebook page - Ennis Creative Arts Centre, will know that I am an avid lover of Crochet. I always tend to crochet instead of Knitting. I teach it here in my studios on a one to one basis to start with and then if someone wants to join the group they can do so.

A long time ago while I was flicking though different websites and blogs I came across a lovely pattern for crocheted butterflies. I loved it and made many of them. So if you want to find the pattern you will find it there. Marie has been very forthright in telling that it's not her pattern but she has a lovely detailed description there, which will enable anyone that crochets to do some. So pop over and say Hi and tell her I sent you. Her photos and description is great.

So after coming across the pattern again I decided I would give it a try. I arranged myself in my front sitting room recently when I had my children put to bed and had the box set of Downton Abbey ready to watch. Since I don't get to see it on TV, I get them at the Library and watch them in my own time. Oh it's better then a good bath.

A cup of Tea, Downton Abbey box set and a new crochet pattern to try. How sad am I. Easily pleased I'd say. (By the way check out your local library to see if they too have DVDs to take out. I can't believe what a great service they have in Ennis. I just LOVE the place..)

Ok so back to the topic in hand. I do tend to go off Topic from time to time.
The pattern is so easy and something that you could manage even if you are only starting off. It's also a great way of using up small bits of wool. So there I was one episode of Downton Abbey later and 4 or 5 butterflies made.

Now what to do with them?

You could use them to embellish anything really. From the fronts of cards to Crocheted Hats, Scarves anything really but I decided I would try and come up with a project that would do them justice. So here are a few of my ideas.

First I used them with some Hairbands.
To make these I had some blank white Hairbands which to be honest I had in my craft room since the year dot and knew they would come in handy some day. (That's why my craft room looks the way it is. I just don't know how people manage to keep their craft rooms so tidy!. I am trying but never manage to keep it exactly so). Anyway take a hairband and wrap the wool around the band nice and tightly. To keep it in place I put a small dab of glue on the inside from time to time. I used a hot glue gun for this.

Then when I had the band covered I attached the butterflies by sewing them onto the thread on the band.

And that's it really. Do try them and they make for great gifts.

You could make them in all colours and for special events - even a white one for a Holy Communion would be lovely or a green one for Saint Patricks Day.

So with them made I decided to make one more project to show off the Butterflies and that was when I came across the wonderful book by Kelly Doust called "The Crafty Kid".


Do check it out. It's wonderful.
In it she has a lovely mobile for a Baby or to hang anywhere. In hers she uses fabric petal shapes but in mine I was going to use the Butterflies.

It's Kellys concept that gave me my idea. In the book she has a beautiful mobile made with petal fabric flowers hanging from it. Do try and get a copy - the book is full of simple to follow projects.

Anyway I needed to make 12 Butterflies for my mobile and a spare one which I attached to the top hanger.

Then take a metal coat hanger and at the base cut it in two. Using the straight section as one piece and the top section as another piece. I used a wire cutter to cut it.


Then take some tape. A sellotape will do and wrap it around the ends of the metal. It's very sharp so the tape will take the sharpness off it.


Wrap the metal with polyester filling. I used some filling from an old cushion I had. Then in order to keep the polyester in place wrap it all with wool. Doing it as tightly as possible.


I then crocheted a piece that would cover each part of the hanger. It kinda looked like a small scarf for a doll. All hangers are different sizes and it also depends on the amount of polyester you put on it so you will have to judge for yourself but I crocheted 15 chain and then did a row of dc and then did a row of half trebles. This gave me a nice pattern to cover my metal pieces. Keep crocheting until it is long enough to cover the length of your hanger.


For the top piece of the hanger I did the same thing only when I got half way across the length of the hanger I wanted to create a hole for the hook to go through. To do this I crocheted half way across the line in what ever stitch you were working on and then I chained for about 6 to 8 stitches and then crocheted the rest of the line.


I hope this is making sense.

Take a look..


When I had all the crochet pieces finished I then sewed it all together.


 Finally to join the piece together I used Embroidery Thread. Et-voila!!!

 What do you think?


 If you are going to try it and need any help let me know. 

So that's the 3rd series of Downton Abbey over. What will I watch now...

Any suggestions?

So if you like what you see and perhaps you would like to learn how to crochet - and perhaps you live close by well why not come along to one of my classes.


Check out my website for more info on classes at http://www.enniscreativeartscentre.com

Love and Laughs.

Shirley
P.S. Next blog is on Decoupaging your shoes!!!


Tuesday, August 27, 2013

Interior Design your home by moving furniture and revamping.....

This morning I had an Interior Design Consultation with a very lovely lady. It's great to go to someones home and be of some help with a fresh set of eyes.

I feel sometimes I would love another designer to come into my home. God knows what she/he would say. You see I believe a House needs to be a home and therefore a home needs to be lived in. I know before I had children everything had its place. Please don't judge me but I had good towels for display and ones that I used. And if there are still people out there that do that well that's brilliant that you can but now I just have given up. Too many smudges of Nutella on my good towels and now they have all just become old towels.

Sure isn't our home the place we come home to after work to relax and chill out. I never judge a persons home. God my own isn't very good itself but I do know this. You can change your house around and make it look so different by just moving some furniture.

Yes move that Couch if you can. Place it somewhere else in the room, if there is space, somewhere where you never thought of before and see how it looks. Take the table out of hall and move it into the sitting room. Try and move things around.

I don't know how many homes I have been into in the last 15 or so years where we rolled up our sleeves and just changed things around and it costs nothing.

OK It costs to have me there but you could try it at home too.

I am constantly moving things around my home here.In these times we don't have any spare cash so the items that once you may have thrown out are now becoming our prize possessions. You can revamp some of your furniture needing very little money and you may just enjoy it too.

I heard a saying recently and I mention it at all my decoupage and painting classes that a builder I knew told me he had a skip outside his door about 7 years ago and it drove him crazy because every morning he would come down and people would have things thrown into it. He then told me that recently he had a skip outside his home and every morning he came down there were things gone out of it. I think this describes so well what has happened here in Ireland. Our mindsets have changed. Ok we are all broke and god people are going through hell but we have all learnt one valuable lesson - we value things more.

Things are getting a new lease of life and are being revamped for another room. The hall stand it getting painted and now lives in the bathroom.

Here is a table that I painted that was in my Daughters room for years and now that it has been done up it's in the front Sitting room.
So perhaps have a little look around the house and any of the pieces that you're not too fond of. Maybe perhaps you could give them a lick or paint , a dab of Decoupage glue and you may just have something you LOVE.

This new era of doing with what we have has caused this crafting period that I think has taught us all many things that during the boom we may have never done. Once upon a time we may have got the children's school trousers turned up by someone else but now we are doing them ourselves. It's just the way it is and by doing so we have all turned into our grannies who kept wrapping paper from the Christmas presents - " Just encase we could use it again".

Am I rambling too much....

Perhaps so.

Before I dash off - if you are thinking of doing up your home or doing some bit of Design to it. There is no set rule of what to pick first and many may not agree but that's fine. This is what I would suggest. Starting with a blank room. Pick your curtains first... or the Suite. Never choose the paint first. That can be chosen later. That's the best bit of advice I can give you...


So off I go and I will see you tomorrow with my Crochet Blog....

Love, Laughs and Creations.

Shirley


Monday, August 26, 2013

So here I am on my Third post feeling like an excited child to be finally writing a Blog. How sad am I? I hope this blog to be a type of, "A day in the life of a wife, a mother, a crafter and an Interior Designer".

I thrive to be the perfect Homemaker, a domestic goddess!, baking brown bread at 8.30, a run at 9.30 and back home to clean the already perfect home and then craft and design while I put on the Roast Chicken, then collect the kids, help them with their homework, Clean up, get them showered and ready for bed. A story and then back to doing some craft work for me. Finally a Hot bath and bed....

Yeah I know it sounds perfect alright....but it's not me. I do aim for that but to be honest if I get half of that done in a day I am doing well so before you start to hate my guts - fear not, I am no Martha Stewart but eh I do LOVE to try.

I usually avoid Housework at all costs but realise that eventually it has to be done.

So this weekend I made jam. I wouldn't blame you if you laughed at the measly amount that I managed to make. I only managed 2 and half pots, but haste not I am determined to collect more berries this week and ad to my stash. But so far Brambly Hedge I am not....
My little helpers and I may have to try a different location this time as we may have exhausted all supplies on the Bumpy Road for now. I wish I hadn't promised the world and it's mother some jam or I wouldn't be under so much pressure. I definitely underestimated the amount of berries needed even though I don't know why as I have made jam many times before. I don't think my helpers ate so much though the last year I made it.

Before you start get your Jars ready. You will need to sterilise them. I usually boil them in a pot but from now on I am going to put them in the oven for about 20mins at 120. Thanks Joanna White for that bit of advice.


I am no expert but I usually use 1 kilo of fruit to one kilo of Jam Sugar. I didn't have a kilo (Of Course! ) so I had to use equal amounts of Fruit and Sugar.


And OH MY GOD all that Sugar.


 Let the sugar dissolve and when it comes to the boil , let it boil for 4mins. Keep stirring at all times.
After four minutes and when it resembles a volcano (Or so I have been told) remove from heat.
And then immediately put into jars.
It's almost sinful. I could feel the hips getting bigger even as I cooked the jam. I know there are probably many other ways of making jam without so much sugar and please do share any ideas you may have. That is of course if there is anyone reading this at all. Perhaps I am just talking to myself but that's OK, I am used to that and I am writing again so that's good.

Initially when I made the Jam I made some fabric disks from remnants of fabric for the top of the jam and planned to leave it like this but as usual I couldn't help myself and put my designer head on and thought - "You can do better then that surely?".


Yes it's a disease, a kind of tick that I have that I think one of my tutors in College passed onto me. You learn to push everything you do design wise to the next level and look at things with designer glasses - so hence my jam pots needed more.


Why bother you may ask?

Why not I say....

And ...I am trying to avoid the dishes anyway.

So here is what I have done. I used some old Ribbon to tie around the Jam pots. Any type of ribbon will do.
I then made some tags with my Sizzix Big Shot machine but you can make them by hand too or just buy some. By the way if you're into paper crafting you should treat yourself to one of these machines. They are just brilliant and you can get Die Cuts in all shapes and sizes. Check out http://www.sizzix.com

Then I got out some pens and paper and using a fine tipped pen I did a quick sketch of some Blackberries and used this for the front of my Tag.
Then using some inks and a stamp I stamped the edges of the tag.
And that's it really. I think we are done.
Just one more thing. We can't have Jam without Brown Bread.
I am sure you all have your own recipe but if you would like mine please let me know. It's so easy. No butter cream. Just Flour, Wheat bran, Sugar (Again), and milk....
Then if you really want to depress yourself altogether and really go the dog on it have your jam with some Queen Cakes....Yum Yum..
Ok so that's it. I am off to boil the kettle...


Friday, August 23, 2013

So today our Crafty efforts have brought us to pick Blackberries. After heading off totally unprepared (as always) in my flipflops, which shall I say haven't left my feet all summer, we headed off on our Day 2 of collecting berries. Day 1 was fairly successful except that we didn't reach our 1 Kilo which I would like to make my jam. The 1 kilo makes about 4 pots and every year I end up giving it as Christmas Presents and I never end up with any myself. So this year since there seems to be an abundance of berries I have promised myself that Chaise Tubber will hide some for our brown bread. 

 Since Today is Day 2 of foraging for our little friends we said we knew where to find them so off we headed for the Bumpy Road. Yes all from Tubber will know where that is. My little helpers told me they knew where to go to find Blackberry heaven and so that's where we went.
I was told I was in charge of the right side and they were in charge of the left. I think it was a ploy to keep me away from them as there was more going into their belly then into the bowl.
So much for 1 Kilo eh!
Many jumping walls later and a few unwelcome thorns in our fingers we had a full bowl.
We had great fun and we would have kept going had the heavens not decided to open up and send us on our Merry Way. But did we find some beautiful ones or what...
We also found some other beautiful flowers. Shall I stress here and now that we didn't pick them. We just enjoyed them. One of which I have no idea what it is. It kinda looks like a cousin of the Red Pepper.. Would love to know what it is.
We found many of these on our walk and not sure what they are. Maybe someone could tell me?So anyway it's off to the Kitchen to see if we have reached our 1 Kilo quota. I have applied a Yale lock to the fridge to stop the little fingers.....Will pop back later with an update..Love and Laughs.